Door control service
Setup the primary door control service:
git clone https://github.com/stakach/ladies-first-chicken-door
cd ladies-first-chicken-door
docker-compose up -d
Once running you should generate a new TOTP secret, I personally use 2FAS Auth as my 2fa application
docker exec ladiesfirst /doorctrl --totp

# copy the secret generated and update the config
vi ./docker-compose.yml
docker-compose up -d
You can then add this to your 2FA application by generating a QR code with the following content: (paste it as text in the generator)
otpauth://totp/Chicken%20Door?secret=<secret generated above>
This will be used as your password for accessing the service
Relay lines
Depending on your hardware, you may have different pins corresponding to relay control.
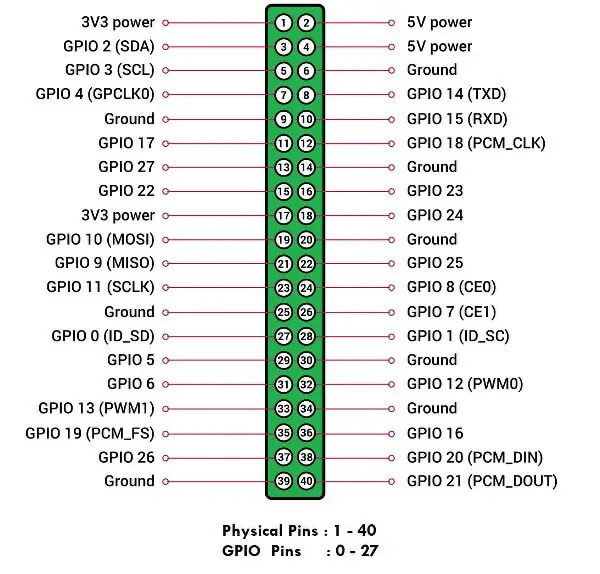
According to the docs on the relay board I’m using, relay channels 1 and 2 are connected with pin numbers 15 and 29 of the Raspberry Pi GPIO respectively
So given the output from running: gpioinfo
- Relay channel 1: pin15 => GPIO22, line 22
- Relay channel 2: pin29 => GPIO5, line 5
Which are also defined in the docker-compose.yml file
Cloudflare DDNS
For simplified access I configured cloudflare as my dynamic DNS service provider.
Add this to the docker-compose.yml file:
  cloudflare-ddns:
    image: timothyjmiller/cloudflare-ddns:latest
    container_name: cloudflare-ddns
    security_opt:
      - no-new-privileges:true
    network_mode: 'host'
    environment:
      - PUID=1000
      - PGID=1000
    volumes:
      - /home/steve/ddns_config.json:/config.json
    restart: unless-stopped
    logging:
      driver: json-file
      options:
        max-size: "10m"
        max-file: "3"
My network is IPv6 enabled and my ISP uses Carrier-grade NAT for IPv4 so I expose this as an IPv6 website and allowed my Pi MAC + service port combination through the firewall
my ddns_config.json
{
  "cloudflare": [
    {
      "authentication": {
        "api_token": "your-api-token-here"
      },
      "zone_id": "your-cloudflare-zone",
      "subdomains": [
        {
          "name": "ladiesfirst",
          "proxied": false
        }
      ]
    }
  ],
  "a": false,
  "aaaa": true,
  "purgeUnknownRecords": false,
  "ttl": 300
}